Wear debris measurement
Mike Johnson | TLT Best Practices May 2011
Before examining your machine’s health, consider both quantitative and qualitative testing methods.
KEY CONCEPTS
•
Wear debris progresses through stages of intensity with particles growing larger at each stage.
•
Observation of wear particles can provide optimum insight into the wear mode and degree of advancement.
•
Ferrous density and imaging methods should be used to supplement spectrometric methods.
Oil analysis provides value that can be characterized as both short- and long-term benefits. For most, oil analysis is oriented toward the short-term focus on oil health (use of analysis to manage lubricant changes). While certainly there is value to be derived from this approach, there is greater value to be found in system analysis. System analysis includes interest in oil and machine health and the presence of lubricant defects (contaminants, wrong lubricant) that are known to promote lubricated component failure.
When turned into system analysis, a clear focus on machine health provides tremendous long-term benefit but still preserves the short-term benefit associated with lubricant change management.
In Part III of this five-part series, we examine information that the reliability engineer would consider for gauging changes in machine health through wear debris analysis.
WEAR DEBRIS PROGRESSION
Machine surfaces don’t typically progress instantaneously from a passive wear to catastrophic wear states. A physically fit machine progresses through stages of increasing wear intensity, with the increase measurable in both wear particle concentration and particle size and shape (particle morphology). Research conducted at the Oklahoma Fluid Research Center Provides a frame of reference for increasing particle size with increasing wear intensity, as shown in Figure 1 (
1).
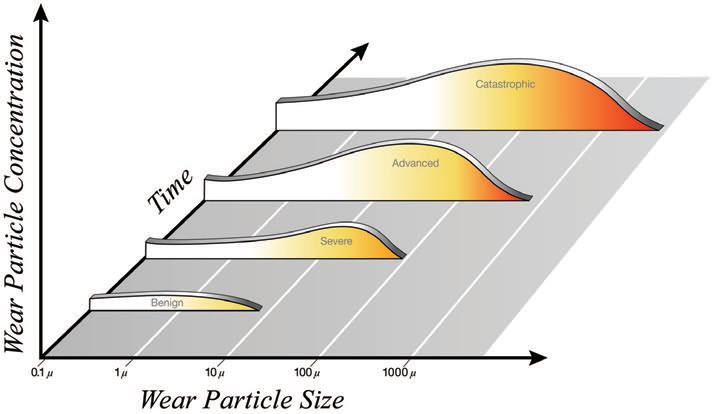 Figure 1. Wear debris particle size increases with intensity (Courtesy of AMRRI)
Accordingly, instrument manufacturers recommend the routine use of technologies that identify both early- and late-stage wear generation and follow-on methods to characterize the debris in order to isolate the mode and component responsible for the debris.
QUANTIFICATION VS. CHARACTERIZATION
The intensity of a machine wear problem can be reflected by increase in both concentration and size of wear particles, but this alone does not provide adequate insight for machine health and preservation. The most common emission spectrometric techniques (plasma, arc emission) used for wear debris analysis are highly preferential to small particle size and consequently work most effectively for machines operating in a normal state producing low-level wear. If used exclusively, these may miss early symptoms of a change in wear state. No single technique can cover the whole range of particle sizes that can be generated as the wear rate increases. Therefore, either the method used must be selected on the basis of past experience of likely failure or several methods must be used (
2).
For a variety of organizational reasons (too much change, weaknesses in long-term data management, weaknesses in long-term focus on reliability management, etc.), identifying pre-existing root causes and having a clear sense of which techniques to use based on historical failure rate is rare. It is best to understand all the common techniques applied to sample-based analysis, their respective strengths and weaknesses and where each technique’s effectiveness ends and another begins. Concentrated wear debris collection and analysis (sump residue, filter element dissection, magnetic residue) and online (continuous) analysis techniques also provide essential insight into machine health.
QUANTITATIVE DETECTION TECHNIQUES
Quantitative detection techniques could be separated into those that are suited best for fine particle and coarse particle recognition. Fine particle recognition techniques include:
Emission Spectroscopy. There are several types of spectrometers used in lubricant analysis. The most common are the Inductively Coupled Plasma and Arc Emissions Spectrometers. The spectrometers are capable of reporting the concentration of between 15 and 23 elements, depending on configuration. Both are widely used and highly reliable reporting wear debris occurring at very low particle sizes. The caveat for ICP/AE spectrometers is their well-known lack of sensitivity to particles above roughly 3-7 microns and virtually no sensitivity to particles above 10 microns.
X-ray Spectroscopy. Also called X-ray fluorescence (XRF), there are two types of x-ray spectrometer designs used for oil analysis: energy and wavelength dispersive. With this technique, the sample is bombarded by gamma rays (X-rays). Secondary or fluorescent x-rays are produced, measured and quantified by the instrument. In both instances, XRS methods do not have particle size limitations inherent in emission spectrometers or the added time for sample preparation.
Particle Counting (PC). Conducted according to ISO 11171, particle counting provides for the measurement of particles in ranges including >4 μm (micrometers), >6 μm, >14 μm, >21 μm, >38 μm and >70 μm. If observed through all five stages, PC technique could give a clear indication in increase in wear particle sizes. Regrettably, reporting the large particle concentrations is often neglected. Additionally, many lubricant analysis labs do not include PC tests in standard test slates for samples other than low viscosity circulation (hydraulic, turbine) systems. Particularly for industrial machines that tend to generate large populations of abrasive, adhesive, cutting, sliding and fatigue debris well above the 14 μm range, this is an opportunity missed.
Rotrode Filter Spectroscopy (RFS). Rotrode filter spectroscopy is similar in nature to the AES technique noted earlier. However, in this instance the oil is filtered through the rotating disk, the debris is captured, the oil is washed away and the remaining debris is vaporized by electrical arc. This approach reveals higher overall concentrations of large wear by volatizing large particles and removes influences from oil Type and viscosity, sample size and particle morphology (
3). The most recent RFS design provides results in scalar units where early designs are reported in parts per million.
ASTM and ISO standards for operating these methods produce reporting in standardized concentration units. Spectrometers report values in parts per million. Particle counters report values in particles per milliliter. When the test is conducted according to standard methods, the reporting units are consistent between different instruments, even if the exact values differ.
Ferrous density analysis is a method that reports a relative quantity of ferrous debris found in the sample volume. As would be expected, this type of test works best on machines that have significant amounts of metallic surface interactions such as multi-bearing and gear-driven machines. There are several methods including direct read ferrography and particle quantifier (Rotary or Hall Effect types). These techniques are also quantitative (report numerical values) but do not report in standardized units. Laser Net Fines is a wear debris density method that can provide results in both absolute (particles per milliliter per ISO 11171) and relative (particle imaging) terms.
Direct Read (DR) Ferrography. This method was developed in the 1970s to provide a means to address particle size detection weaknesses with spectrographic methods. The technique measures concentration of both large and small ferrous wear debris in an oil sample (
4). DR ferrography is performed by passing the sample through a treated glass tube that is positioned over a high gradient magnetic field, as shown in Figures 2 and 3. Larger ferromagnetic particles are deposited at the oil entry side, and the smaller particles that are less susceptible to the magnetic field are deposited toward the exit side.
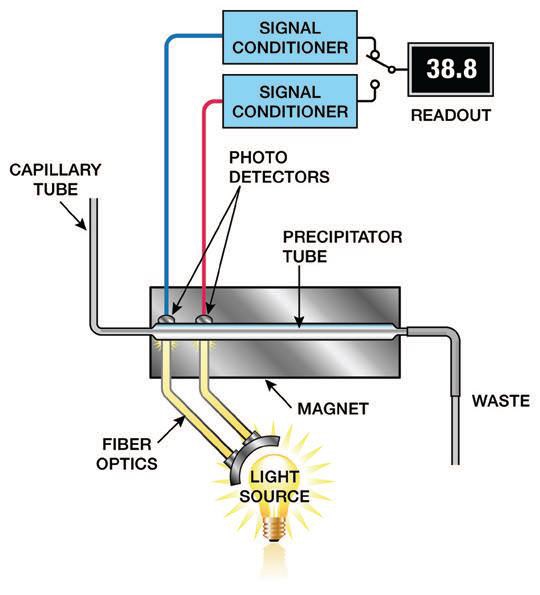 Figure 2. Schematic of a DR Ferrograph (Courtesy of AMRRI)
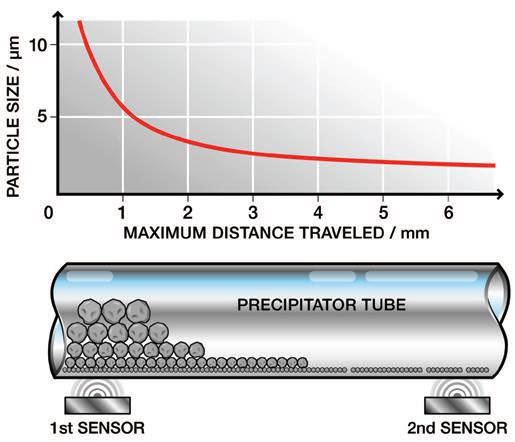 Figure 3. Diagram showing the accumulation of ferrous debris in the precipitator tube according to size. (Courtesy of AMRRI)
Light sensors mounted at each end of the tube are used to transmit light through the debris field. Photo detectors measure the amount of light passing through the field and assign concentration values for small debris (DS – for particles ≤5 microns) and large debris (DL – for particles ≥5 microns). Once the concentrations of small and large particles are determined, the ratio of large to small particles (percent large particles – PLP) and the total wear particle concentration (WPC) also are reported. The weak magnetic nonferrous particles also can deposit on the slide, but their deposition is not a function of size. They may be found at any location on the slide. Depending on the conclusions (WPC, PLP), slide review may extend to a microscopic analysis called analytical ferrography.
Particle Quantifier (PQ). The particle quantifier (PQ) exposes the lubricant to a magnetic field (the Hall Effect), as shown in Figure 4. The presence of ferrous debris causes a distortion in the field, which is represented as the PQ Index Value (vs. Two values provided by the DR technique). The value is an arbitrary unit of measurement that correlates well with DR Ferro large but does not correlate directly to other wear debris units of measurement. If the PQ Index Value is smaller than iron parts per million (ppm) reported by AES/ICP, the concentration of particles larger than 10 microns is expected to be small. If the PQ Index increases dramatically while the ICPs iron parts per million (ppm) remains consistent or goes down, larger ferrous particles are being generated. Analytical ferrography should then be used to qualify the type of wear occurring (
5).
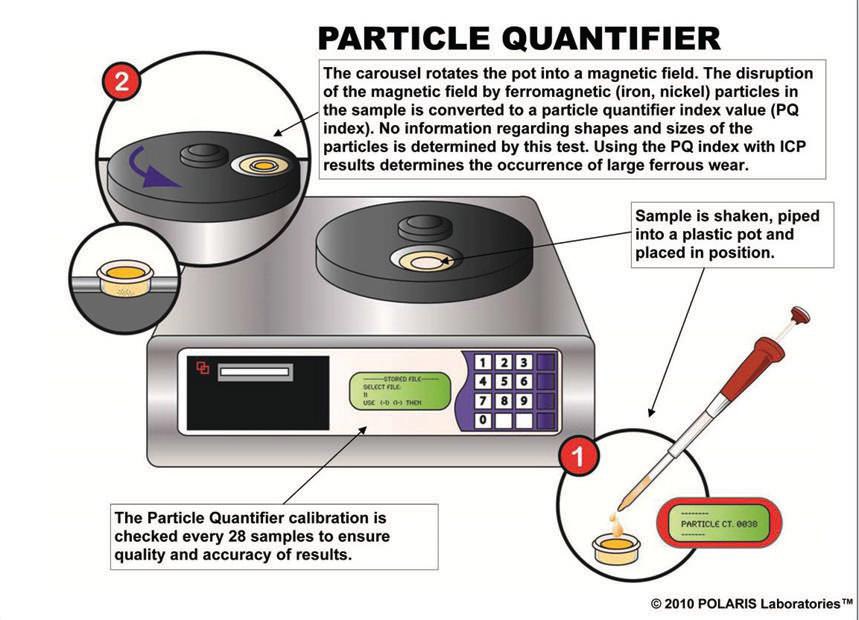 Figure 4. The POLARIS Laboratories™ technique for use of the PQ instrument to clarify wear intensity. (Courtesy of POLARIS Laboratories)
The next generational step for particle quantification using the Hall Effect is characterized by the Kittiwake Instruments fdMPlus. This method accounts for all metallic iron and its magnetic alloys by surveying the entire fluid contents of the sample. With a known fluid volume and iron concentration, PPM value can be reported.
Laser Net Fines (LNF). The LNF instrument combines characteristics of viscosity measurement, particle counting and particle characterization into one instrument to provide users with a measurement of debris between 4 μm and 100 μm in size. Particles are sized and distributions are reported to the operator by ISO Code (>4 μm, >6 μm and >14 μm) and/or other codes such as the NAS Code (5 μm-15 μm, 15 μm-25 μm, 25 μm-50 μm, 50 μm-100 μm and >100 μm).
Particle quantification is enhanced with an imaging and comparative analysis technique that provides users with a pixel display of images over 20 μm and classifies debris images into five categories. Figure 5 provides a simplified look at the LNF test cell (
6).
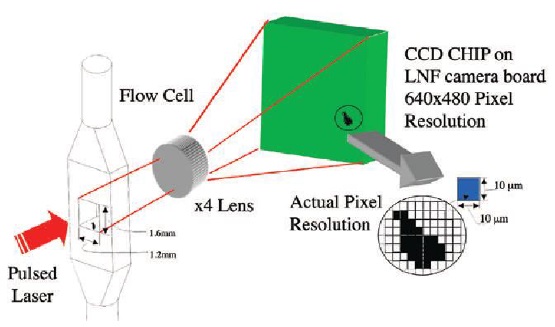 Figure 5. Laser Net Fines system operation overview. (Courtesy of Spectro, Inc.)
As shown in Figure 6, a variety of particle shapes and sizes can be automatically reported, providing the analyst with the means to make a rapid determination about changes in wear intensity and wear mode.
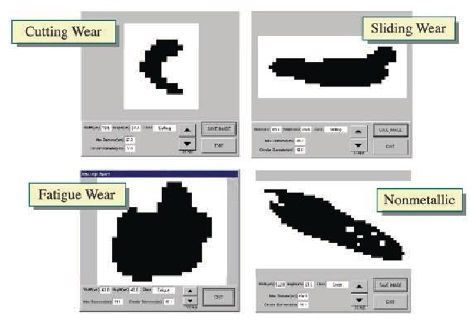 Figure 6. LNF shape classification and reporting display (Courtesy of Spectro, Inc.)
QUALITATIVE DETECTION TECHNIQUES
The several instruments reviewed so far provide some method of quantifying the size and concentration of debris in the lubricant with varying degrees of resolution. Each has its strengths and weaknesses and can markedly add to the quality of the final output from the on-site or offsite lab. After measurement, if the change in the quantity and/or size of observed debris is significant (a plant-specific decision) then the remaining high-value action is to have the debris microscopically evaluated through a method known as analytical ferrography.
Within this method, the analyst places a slide containing deposited debris in a powerful microscope for evaluation. Particles are characterized according to their size, shape, color, angularity, dimension (length to width) and softness and also may be subjected to magnetic, light and heat treatment. This technique is time-consuming and requires that the instrument operator have appreciable experience to derive maximum benefit from the technique. Figure 7 illustrates how the operator may use magnification of deposited debris to identify evidence of a specific problem.
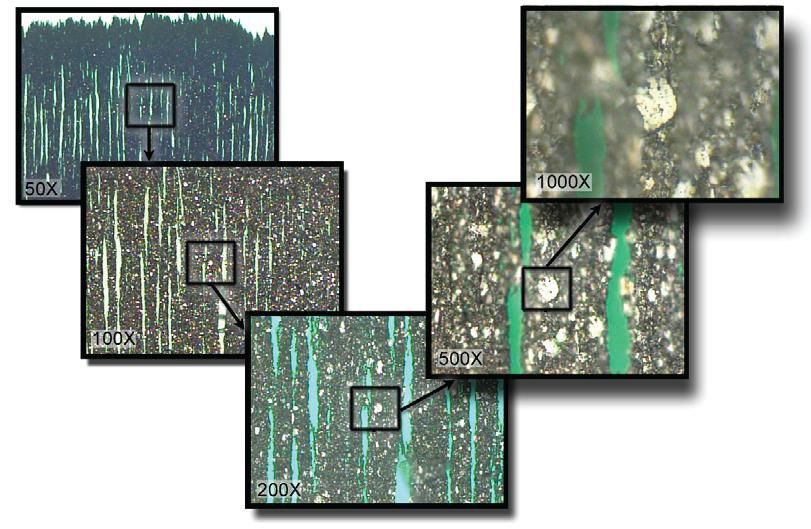 Figure 7. A close-up examination of rubbing wear debris field reveals a sliding wear condition in a gearbox, with some instance of fatigue, as shown at 1000X. (Courtesy of Condition Monitoring International)
OPTIMUM IDENTIFICATION
With the wide variety of tests available and the recognition that the routine wear debris tests (AES, ICP) do not fully represent wear conditions, the reliability engineer must make test slate selections that provide the maximum information for the available funds.
There are several combinations of test packages that could effectively cover the particle size and concentration spectrum in one way or another. If the purpose of sample collection is to evaluate oil health, then adding any of the presented test methods will not add value. If the purpose is to measure system health, then one should ask about the failure modes and patterns of the particular system in question.
Machines that experience high rates of small rubbing wear particles and corrosive wear debris, such as engines, are served well by spectrometric methods. If spectroscopy testing (ICP/AES) is positive for increase above an alarm threshold, then the first non-routine test would be RFS, effectively expanding identification of the entire array of engine metals including particles in the catastrophic range (>38 microns).
If RFS results exceed an alarm limit, affirming a high concentration of large particles, then the next non-routine test would be LNF. Particle counting can be done to identify concentrations of particles above the ICP/AES sensitivity range, but it is difficult. LNF is a strong option because of its reported ability to see through dark oils. If LNF is positive, then confirmation via analytical ferrography would be the last stage of analysis. This approach provides progressively revealing data that justifies the next step.
Industrial machines and components normally degrade from seven common wear modes:
1.
Abrasion
2.
Adhesion
3.
Corrosion
4.
Fatigue
5.
Erosion
6.
Cavitation
7.
Electrical discharge.
Wear particle sizes contributed by the first four modes are most common and tend to be large and are not fully represented by routine spectroscopic methods (
7). Test slates for circulating systems, drive trains, bearings (plain and element), hydraulic systems and plant service compressors should routinely include methods for identifying an acceleration in wear.
These machine test slates should include spectrometric (ICP/AES), particle identification (PC) and ferrous concentration (DR Ferro/PQ) as routine methods. If a threshold alarm is exceeded in either ICP/AES and PQ, the next non-routine test would be either LNF or Analytical Ferro, or perhaps both.
Figure 8 provides a correlation between the test methods presented in this article and the particle sizes that each of these methods is capable of measuring. There is enough overlap between these methods and the hierarchal structure offered that most commercial labs should be able to provide coverage for the required tests.
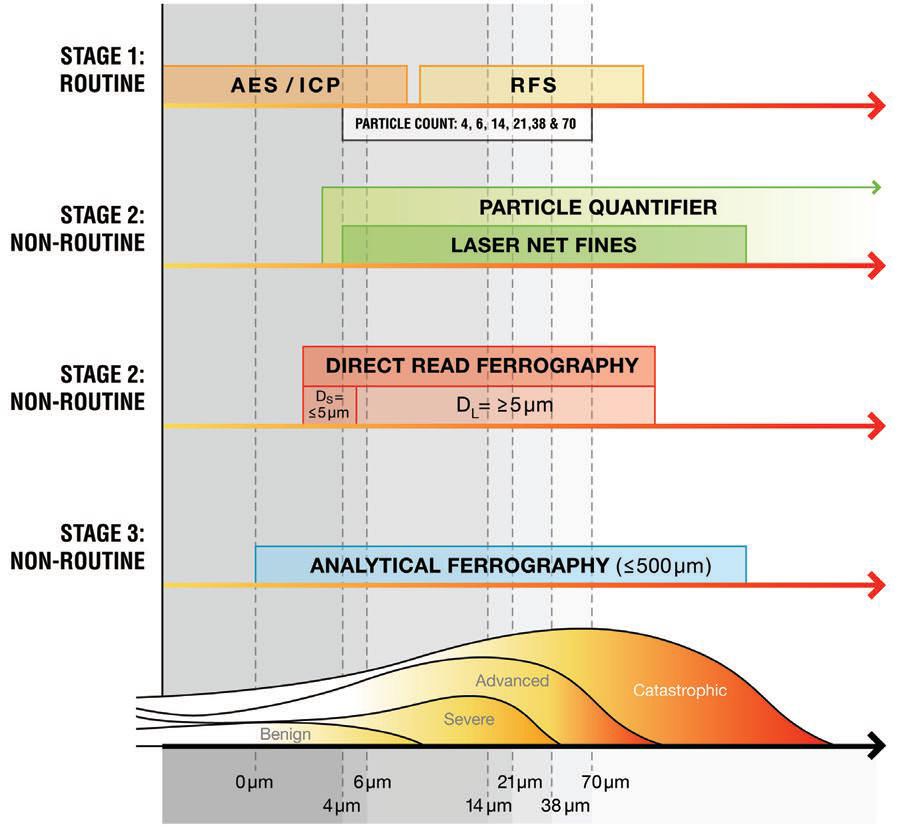 Figure 8. Multi-Parameter Test Method Qualification Chart. (Courtesy of AMRRI)
Also, there is enough overlap between the methods that no single course of action could be declared to be best. The reliability engineer must assess his service lab capabilities, the machine failure modes and must work to accomplish the broadest and most thorough method for grading wear debris for his budgetary limits.
CONCLUSION
There are common wear modes for most machines that produce wear debris that is too large to be identified by the most commonly used wear debris analysis tools. Coupling additional techniques to routine test slates and establishing automatic triggers to escalate testing into non-routine tests can overcome this sensitivity weakness.
Tests can be divided into quantitative and qualitative methods, each with merits and drawbacks. A recommendation is provided that the practitioner could consider for decisions to layer in secondary and tertiary tests to complete the machine wear debris profile.
REFERENCES
1.
Fitch, E.C. (1992), “Proactive Maintenance for Mechanical Systems,” FES, Inc.
2.
Wright, G.J., and Neale, M.J. “Wear-Debris Analysis as an Integral Component of Machinery Condition Monitoring,”
Journal of the South African Institute of Mining and Metallurgy, August 1987.
3.
Lukas, M., and Anderson, D. “Analytical Tools to Detect and Quantify Large Wear Particles in Used Lubricating Oil,” Page 2, Spectro, Inc.
4.
Ibid.
5.
Click here.
6.
“Laser Net Fines Reproducibility Test with Medium Test Dust,” Spectro, Inc., Bulletin LNFC-08.
7.
Johnson, M. (2007), “Oil Analysis: Past, Present & Future: Part II,” TLT,
63(6), p. 35.
 Mike Johnson, CLS, CMRP, MLT II, MLA III, is the principal consultant for Advanced Machine Reliability Resources, in Franklin, Tenn. You can reach him at mike.johnson@precisionlubrication.com
.